Our iPad Use – On Video!

It has been WAY too long since I’ve posted, so I am planning a few ideas over the next few days…

The first one, which my class had been working on for a little while, is available for viewing below – our first video!  (Don’t get too excited, it’s only 90 seconds!)  We’ve been talking more and more about creating our own videos, and this is the first one that we’ve organized and put together.  (Permission to post this online has been granted by their parents, so no worries!)


Since we’ve made this video, the students have shot several videos of themselves giving brief presentations on projects that they have completed.  (This is in place of those whole-group presentations that take SO long to get through.)  Many of them have gotten more comfortable on camera and they enjoy watching themselves and re-shooting, which just allows for more practice with those fun speaking and listening standards.  : )

We are hoping to start using iMovie in the near future, which will allow for easy editing and even more creativity!   I would like to put together a self-assessment rubric for the students to use as they watch their video presentations.  Here is a rubric from Kathy Schrock that looks like a great starting point – Video Production Rubric – Kathy Schrock.  (Isn’t she just the best?  Thanks, Kathy!)

Thanks for watching and have a great weekend!

: ) Brandi

Happy Computer Science Education Week!

Aahhh, I know it’s been so long since I’ve posted, but I’m excited to say that our iPads are finally going to be updated, which means things will be able to move along a little more smoothly!  By next week, we will be reorganizing and testing out some new things with our updated versions… Unfortunately, this will be right in time for our winter break. I’m sure I will be ready to get back into the swing of things in January and hopefully keep working on our Quarter 2 goals. : )

Until then, there’s this story going around about the Hour of Code and I cannot WAIT to get the kids started on it!  If you haven’t heard about it, check it out at csedweek.org.  (On Twitter, check out #csedweek and #hourofcode!)

There are videos, recommended apps, and even a program for students to work through that walks them through the basics of coding.  It starts off with basic movements and gets more complicated after each level.  You can easily sign up and students can log in and create their own username.  Seems like an easy way to get the kids excited about computer technology! (or rather, MORE excited!) : )

I will definitely be updating to share how our Hour of Code goes this week, and I’d love to hear other stories as well! Which apps do you think the students will enjoy the most?  Hopefully we will be able to try several of them out… (Kodable, Hopscotch, LightBot, etc?)

Thanks for stopping by and have a great Computer Science Education Week!

: ) Brandi

Learning the Basics: Initial Lessons

Now, it may be difficult for some people to hear this, but school is not just about academics.  (GASP!)  Our first few weeks of school have been filled with all kinds of life-long lessons that the students will be using.  They even come in nifty categories to make it easier for me to post for you! ; )


DIGITAL CITIZENSHIP :

Digital Citizenship Components

No matter what grade you teach, if you are going to be integrating technology into your classroom in any way, these lessons are a must.  There are many different ways to go about it, and there a lot of resources online, but it just happened to be a concidence that what I found to use was the same thing that my county was choosing for us to use as well: Common Sense Media.  (This is also a great resource to let parents know about, since it reviews books and movies to help them choose appropriate media for their children.)  They have grade level specific lessons, posters, and videos for classroom use, so you do not have to create anything on your own.  However, I did merge the ideas that I found on their website with the document I mentioned last week, which you can find here.  I knew that I wanted to introduce the students to specific topics, so each lesson was focused on only one of the elements.  It included the definition of the element, focus questions that were discussed with their small groups and then the whole class, and scenarios that allowed them to decide if the element was appropriately understood.  These are the lessons I used throughout the first two weeks:

      • Digital Access
      • Digital Etiquette  (BrainPop has a FREE video with resources on this one!  Score!  Here it is!)
      • Digital Literacy
      • Digital Communication
      • Digital Rights & Responsibilities
      • Digital Safety (Security)

Each student had a sheet that they kept in their binder (within the “iPad” section) to record their thoughts about each element at the end of each lesson.  Finally, to make sure they understood the elements that we discussed, I had them write to explain to me what each element meant to them as part of their learning process.

I feel like the time I spent on this aspect was well spent and extremely necessary, since I was planning to use the iPads on a daily basis.  Even if students are just learning to explore more digital resources online, these are lessons that they should be exposed to as they become a part of the digital society.  (Plus, they think it is super cool that they are becoming a part of a “society”, so as usual, it’s all in the delivery!)


IPAD 101 :

I had given the kids (and parents) a technology survey before school even started, so I had information about what kind of technology the students had already been exposed to at home.  As expected, there was a HUGE range of experiences, from using a device like an iPad independently, to not having internet access at all, even on their family’s cell phone.  One of the parent concerns at our meeting was regarding the students who had no experience interacting with a tablet before.  It was going to be important to start from the beginning, no matter what the students’ experiences were.  I created SMART Board slides (within my weekly lesson files), as well as “cheat sheets” for the kids’  binders on the following topics:

      •  Buttons and Screens  (Sleep/Wake button functions, Home button functions, swiping to screens, swiping to Spotlight search, creating app folders, etc.)
      • Charging  (When, How, How Long, and Battery-Saving tips)
      • Bluetooth Keyboard  (Set-up, Bluetooth connection, Charging)
      • Multitouch Gestures (Four-finger swipe, three-finger zoom, etc.)  They really get a kick out of this stuff and think I am the coolest for showing them how to use these shortcuts.  Cool points for me. : )

The tasks that I assigned were built around these lessons and it was interesting to learn that they were going home and sharing what we had talked about in class with their families.  (Especially the tips about charging the iPad, since it could be applied to other devices as well.)  One student mentioned that she informed her father that he had been “overcharging” his phone and if he wanted to save its battery life, he should really listen to the tips I had given to her.  Oh dear… : )  (But, way to go!)

DIGITAL TOOL LESSONS :

Each new tool I introduce to the students will be an important resource for them, so they have a graphic organizer to complete, which ensures that they understand how we are going to be using it in the classroom.  (Observe optimistic thinking here. ; ))  The organizer includes a space for them to record the purpose(s) of the tool, acceptable use reminders, effective educational uses, and their own opinions.  (We complete the first two parts before using the tool, and will complete the second two after using it for a few weeks.)  It also includes information on how they log into the resource if necessary.  (We have gotten used to writing down the log in convention instead of their own personal log in information, to make sure that we are keeping our information safe!  Some of them are extremely concerned about this!  Yay, digital security!)  So far, the tools that we have learned about are:

      • Safari browser – Using tabs, creating bookmark links, searching, using the “reader” option, zooming capabilities
      • TypingWeb (online) – Logging in, navigating the lessons, periodically accessing the typing test
      • Renaissance Learning apps – STAR Reading Enterprise test, AR quizzes and records for tracking their progress
      • Gaggle (secure email – online and app) – Email access, creating documents in Digital Locker, locating and submitting assignments, and organizing personal calendar events (Definitely multiple lessons!)
      • iBooks app – Accessing the available ebooks, using the highlighting tool, annotating using the notepad
      • Dictionary app – Searching, marking favorite words (for vocabulary reference)

If you remember from a previous post, I had created a bulletin board that tracks the progress of our digital tool use… It’s been really helpful for me because it keeps me on track and moving forward.  Each week, I know that our progress needs to be updated, PLUS I get to pick out a new resource for us to learn about.  I’m trying hard not to move too fast, even though a few of the kids would definitely be ready for more.  I don’t want to overwhelm them, and I of course need to make sure I’m getting to the curriculum.  (Remember that stuff?  Yup, we’ve been fitting that in, too!)


TROUBLESHOOTING :

Not everything has worked exactly as planned.  (Hopefully none of you are shocked by this.)   This is both good and bad.  Bad because I want everything to work the way it’s supposed to every time (here’s that optimistic thinking again), but good because it allows us to address issues we are having as a class.  For example, our wi-fi isn’t exactly the greatest.  : )  It will sporadically kick the kids off, and so we have had to have mini-lessons on what they need to do in those situations.  Many of them have caught on very quickly that this is a regular occurance, and do not feel the need to inform me every time it happens.  (Notice that I did not say “all of them have caught on”?)  Checking the wi-fi under their settings and restarting the iPad are both part of their “troubleshooting” strategy.  As things come up, we have a quick lesson on what can be done, and they’ve gotten much better at solving these problems on their own.  (Thank goodness.)


Since it has only been three weeks, there are still many lessons to work into our schedule, but this is how we started out!  Now that we have some knowledge under our belt, we will be working more with digital assignments in (and possibly out) of the classroom.  Workflow in a 1:1 classroom is important to plan for, so next time I’ll let you know how ours is working out!  Thanks for visiting and have a great week!

: ) Brandi

Meeting the iPads

So this year was definitely the first year in a while that I was legitimately stoked for the first week of school.  (“Excited” wasn’t quite getting the job done there, so I had to bump it up a notch…)  Scared out of my mind of course, but super stoked.  The kids and parents had already been prepped, thanks to our pre-first-day-of-school parent meetings.  Being able to have face-to-face conversations with the parents about the program was by far the best way to start the year off on the right foot.  It allowed them to see how much time and effort we were investing into their children’s education and how much we believed it was going to positively affect their learning environment.  They asked relevant questions and were looking forward to their children being able to have this opportunity.  It was important that they were made aware (in person) that this was going to be a much greater responsibility than their child had ever been given before, and that there were going to be consequences for violating our policies.  There was no resistance at all regarding the Student/Parent Agreements that needed to be signed, so we were good to go!

I was undecided about which day I should actually put the iPads into the kids’ hands.  I knew that it definitely wasn’t going to be Day 1, and they were disappointed (surprise!), but understood.  There are just so many things to go over on the first day!  Standard classroom procedures, you know the drill… Really engaging stuff.  I had already planned to use a SMART Notebook file to organize my weekly schedule, and it helped to keep me on track (and not sprint ahead!). 

On the second day (the BIG DAY), we started off with a class meeting and discussed several points: the perceptions that others will have about this program and appropriate ways to respond to questions they might have, how their choices outside of the classroom will be an indication of how responsible they are capable of being inside the classroom, and things they were either looking forward to or worried about as we started up our new adventure.  It was really amazing to have our Assistant Principal join our meeting (crossed legs on the floor and everything!) because they were able to hear his perspective on our thoughts as well.  This was definitely the most important part of our day, and I was relieved that they were all willing to participate and share their thoughts with the rest of their classmates.  After going through the document of guidelines and policies point by point, it was time to introduce our digital citizenship elements.  This document (which is excerpted from Chapter 2 of Digital Citizenship in Schools, Second Edition by Mike Ribble) was the guide I used to set up the lessons I created for each element.  It includes the definition of each element along with an explanation, and also provides appropriate and inappropriate uses.  Such a great resource! 

Then (FINALLY), it was time to meet the iPads!

iPad 101 – Lesson 1:  Buttons and Screens

Basic “I do, We do, You do” strategy here.  I went through the information on the SMART Board (taken from the iPad User Guide), showed them each part and corresponding function on my iPad, then had them explain to me what each part did before sending them back to their seats.  By this time, they were basically exploding from the anticipation of it all!  They knew that they were expected to leave the iPad flat on the table in front of them for today, and they definitely did not want to lose their first chance to use it.  The directions that I wanted them to follow were displayed on the board, and so as I handed out each device, they could work at their own pace to figure everything out.  (Turning on the iPad, checking out the apps/links on the Home screen, swiping to the second screen to find “folders” of apps, and accessing the school’s website from the link located in the Dock.)  Their reactions (especially from the ones that had never used a device like this before) were priceless.  I could also tell right away that there were several students that were extremely familiar with this type of technology!

At this point, I realized that we were probably going to be able to move a bit faster (and I wanted them ALL to be able to go home and tell their parents that they learned something brand new), so I decided to show them how to add a link to their Home screen that we were planning to use almost every day, TypingWeb.com.  (TypingWeb is a free web resource that tracks student progress through a variety of typing lessons.)  It was only the first day using the iPads, and the students had all successfully created a bookmark link, renamed it, and moved it to their Home screens.  I was excited, they were excited… It was a good day. : )

I know that it will not be this easy every day.  Since that second day, we have run into a few “bumps” as expected, and I plan to chat about those very soon!  They don’t discourage me, and I’m training the kids not to be discouraged either!  It’s all a part of our process and each step gets a little better.  Here is a post on Edudemic written by Tom Daccord and Justin Reich of EdTechTeacher that I’ve recently read, “Failure is Mandatory: Creating a Culture of Innovation”…  It helps on those days when things are going wrong. 

Coming up, I’ll be posting more about our digital citizenship lessons, and of course more iPad 101 lessons!  Setting up the bluetooth keyboards was an experience… : )

: ) Brandi

Planning the Adventure – Part 2: SETUP!

Hey there!  Welcome back!  I’m just going to keep rambling about how our little program came to be… : )

Spoiler alert.  The first part of the planning which I’ve already described didn’t ACTUALLY happen first.  It just happened first for ME.  There was A LOT of planning that had to happen “behind-the-scenes” that didn’t include me at all.  The early decisions made by my Assistant Principal and Tech Specialist helped to ensure the success of many aspects of this program.  Without their foresight, a lot of things would have been much more difficult, and I can’t even tell you how grateful I am to them for being so supportive throughout this whole process.

CLASSROOM SETUP:

1.  Charging Plan – There’s a lot of different ways to handle using technology in classrooms, and if you’re using 1:1 devices, you have to plan for a way to charge them.  Here’s what we’re doing:

Charging Tables

Notice the handy-dandy outlets that pop up in the middle of the table?  There is also a place for two USB connectors… Oooh! : )  Other options include charging carts or cabinets, but once the batteries start losing their charge faster, it will be extremely annoying to have students only able to charge their device in the cart.  (Or for that matter, at an outlet in the corner of the room.)  A huge thank you goes to the Tech Specialist for researching (and planning and measuring, etc.) in order to find the PERFECT tables for the classroom!

2.  iPad Storage and Organization – Well… This part has been a never-ending process.  Literally.  I’m still trying to find what kind of storage will work the best.  Ideally, I’d like a storage bin for each table that includes a place for each of their iPads, their chargers, and the other accessories such as styluses (styli?) and screen wipes.  I’ve seen so many different options, even some that use dish racks!  So creative!  As for cases or sleeves, we are still working on that as well.  The iPads use a Logitech keyboard cover (which was also due to research done by the Tech Specialist!), and they are super sleek!  However, when the students aren’t using the keyboard, the iPads will need to be in a protective case.  Most definitely.

3.  Classroom Walls/Boards – I knew that I wanted to have focus walls for our Digital Citizenship components, but I wanted to leave room for the students to add their work as well… Here’s a few things that I’m starting with:

Digital Citizenship Components      Digital Footprint     Student FootprintsDigital Progress Board

If you’re familiar with the word “Marzano” : ) then you will recogize the progress board… So far, the kids seem to understand the progression, so as we move the tool cards, I’m hoping they’ll be looking for ways to use them in creative ways.  I mean, INNOVATING ways. : )


PAPERWORK:

Who doesn’t love paperwork? : )  Here are several things I’ve drafted:

    • iPad Program Guidelines
    • Student/Parent Agreement
    • Policy Violations Notices (1st Offense, 2nd Offense, 3rd Offense, Major Offense)
    • Student Action Plan (required with 2nd Offense, 3rd Offense, and Major Offense)
    • Program Goals

We discussed with the parents that since this is a pilot program, everything is considered a work-in-progress.  Hopefully there won’t be too many items that need to be changed, but we may be required to add details here and there as different situations arise. 


IPAD SETUP:

1.  Apple IDs – This was another thing that the Tech Specialist took on and thank goodness he did, because it made setting up the iPads so much easier.  Several Apple IDs were set up for our school so that any purchases or downloads could be approved by various ID users.  The Apple ID that I use to directly load apps onto the iPads is the lowest level of the heirarchy and all of the iPads are logged into this same account.  (I may not be describing this well at all, I just know that it was a really important part of being able to quickly load the same apps on all of the iPads.)

2.  Loading Apps – Because each iPad is on the same account, every app that I downloaded on one would automatically show up to be downloaded on the others.  I cannot even tell you how excited I was when I realized that it worked the same way for any eBooks I downloaded!  Woohoo!!!  Syncing them all took a little time, but since I had already planned out which apps and links I wanted to start with, it wasn’t too bad.  (I started timing myself, and was super proud when I was finished setting up one of the iPads in less than 5 minutes!)

3.  Identification – The iPads all have a number labeled on the outside of the keyboard cover .  The iPad itself needed its own label as well, and I found these number photos online here!  (Thank you Jennifer Magiera!)  I just downloaded them and could easily set both the Lock and Home Screens. iPad Screen


I know there are probably other things that I should have mentioned here, so if there’s something that is blantantly missing, let me know and I’ll add it asap.  Hope this gives you a little glimpse into how we started our program!  

Stop by next time for a report on our first weeks of school!  (The first week was awesome and the kids were really excited to get started, so we were able to do a few more things than I originally planned.  Guess I need to keep OVER-planning, just in case!)

: ) Brandi

Planning the Adventure – Part 1: RESEARCH!

So, you’re going to be using iPads in the classroom?  First step…  Figure out what the first step should be!  The word overwhelming just doesn’t cut it here, so I’ll just say that it took me some time to wrap my brain around the implications of this little project.  This was a problem, and the best way I’ve learned to solve problems is to, of course, USE THE SCIENTIFIC METHOD!  So, put on your seatbelts (fair warning), because here we go… : )


1.  QUESTIONS!  (Seriously, so many questions.)  Here are several that came up early in my process:

  • What will be the primary goals of the program?
  • What classroom management strategies and procedures are going to help encourage a smooth transition from the traditional classroom to a digital classroom?
  • What policies need to be in place in order to ensure a successful rollout?
  • Which web tools and applications are supported by my school district?
  • What will my classroom digital workflow look like?
  • How can I make sure the students are being responsible digital citizens?
  • How am I going to make sure I am moving through the SAMR (Substitution – Augmentation – Modification – Redefinition) model of integrating technology into my instruction?  (In other words, the students should not be performing the same tasks as they were before, simply with the added use of technology.  I need to work towards integrating new tasks that were not possible before the addition of technology.)  Here’s a link to a cool SAMR Interactive Graphic that explains this model more expertly than I can… : )


2.  RESEARCH!  (And collect data!)  One nice thing about being behind the eight ball is being able to learn from others.  Since there are so many districts, schools, and/or teachers that have started similar initiatives, there is SO MUCH information out there.  If I would list every single resource I have perused over the past few months, you would most likely roll your eyes and say “Really?!”  So here are a few that I have found extremely helpful:

Twitter has become a game-changer for me.  It’s unreal how much information I can access based on the people I follow.  I love finding teachers that have been through the same process, or are going through it now.  I find someone new to follow all the time, and I feel like it’s one of the coolest (FREE!) professional development opportunities out there.  If you’re into that kind of thing, of course… : )

During this phase, I literally made list after list of ideas that I found… One of the lists that I’ve had and have been revising since the beginning is my “lesson plan” list.  How was I going to work these tools into my instruction?  Which ones were actually going to work in my classroom?  Would the kids be able to use them effectively?  (At all points in the process I would digress to questions.  And of course, that would lead to more lists.  And lists of questions.  I’m not even kidding.)  So now that you have gathered some information…


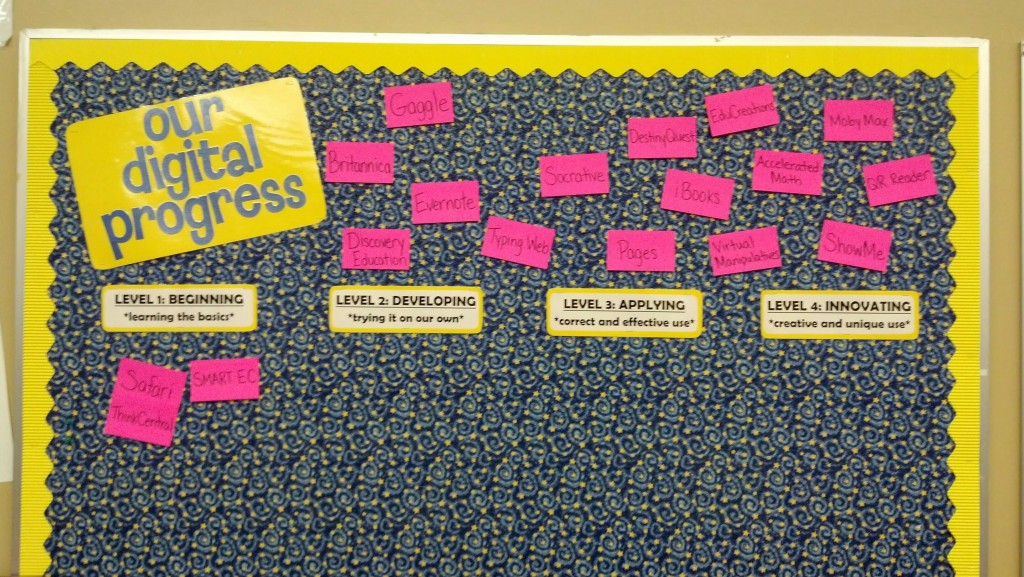
3.  ANALYZE DATA!  Decisions have to be made, people.  Is this app “in” or “out”?  Will it help me reach the goals of the program?  (See? Always with the questions!)  Easy part: finding apps and web tools to use in the classroom.  Hard part: deciding which apps and web tools to use in the classroom.  This step actually has multiple steps.  (Just to make it more fun.)  I needed to define my goals, determine which tools would help me reach those goals, and learn how to best implement those tools in my new instructional plan.  (No big deal.)  So here is what I came up with as an initial goal list, which does NOT include the implementation methods just yet:

Goal #1:  Model effective daily use of digital curriculum materials. 

*ThinkCentral (online) – Electronic textbooks and other curriculum resources

Goal #2:  Utilize digital assessments and immediate feedback to focus and drive instruction. 

*SMART VE (online) – Online assessments (curriculum-based and teacher-created)

*SMART Extreme Collaboration (SMART add-on) – Quick polls to assess understanding

*Socrative (online/app) – Online assignments, quizzes, exit-tickets, and polls

Goal #3:  Increase opportunities to read and respond to complex texts not readily available in print form. 

*iBooks (app) – E-reader for online books, can highlight and annotate on text (Project Gutenberg for free ebooks)

*Gaggle (online/app) – Post files and links for student access during class as well as at home, respond to text electronically with classmates as well as direct teacher communication

*Goodreads (online/app) – Rate, review, and recommend books

Goal #4:  Teach research strategies to preview and explore content, and evaluate digital resources in order to select the appropriate tools to accomplish a variety of tasks.

*Safari and *Britannica – Model best practices for researching online

Goal #5:  Provide opportunities to create original products which communicate a content-related concept or process. 

*ShowMe (app) and *EduCreations (app) – Combines audio with text to support effective oral communication

Goal #6:  Encourage peer collaboration using online forums and interactive applications.

*Gaggle (online/app) – Create small group opportunities for students to interact and collaborate

*Whiteboard (app) – Allow partners and/or small groups to create collaborative products

*Common Sense Media digital citizenship lessons

Goal #7:  Promote effective keyboarding skills. 

*Typingweb.com (online) – Provides progressive lessons and tracks student progress with teacher reports


We made it!  There’s light at the end of the tunnel!  (Just understand that this is most definitely the longest tunnel ever.)  Now that there is a plan (I use that term loosely here), we can start to figure out what the setup will look like.  OOOH, setup!  (This will include fun things like paperwork, Apple IDs, and organization!)  SO EXCITING!!! : ) 

Thanks for stopping by!  Tune in next time for some classroom setup fun!

: ) Brandi

Hello world!

The first one is always the scariest, right?

I am currently a 4th and 5th grade teacher in Florida and am about to embark on a brand new adventure.  This year, I will have the (awesome) opportunity to utilize iPad minis in my classroom with my ever-so-lucky 5th graders.  Seeing as this is an up and coming tech trend, I felt as though I should try to document as much of my journey as possible…  Not just for those who are also passionate about the future of technology in education, but for me to look back on as well (and laugh at all the mistakes I am most definitely going to make!).

I am by no means any sort of expert on anything… yet.  : )  But I know that there are a gajillion people out there who are trying to accomplish the same goal as I am.  (How do I know there are a gajillion, you ask?  Go ahead and google EdTech or iPadEd and see where it leads…)  My two cents are simply going to add to the growing collection of resources available to those of you who enjoy reading about the successes (and failures) of fellow teachers.

A few things to keep in mind about me…

1) I’m now a social media addict.  Not in the “Where did the Kardashians go for dinner?” kind of way, but rather a “How am I supposed to keep up with all the articles in my twitter feed?” kind of way… My point is that I will be including information that I’ve come across either through Twitter, Facebook, or Google+ (my newest addiction) throughout my posts.  So much is out there, and we teachers are quite simply the best at borrowing other’s ideas.

2.  I’m planning to make mistakes.  I mean, not PLANNING to, but accepting the fact that they will definitely happen.  I’m pretty open to trying new things, and I’ve done a pretty good job in expecting things to go wrong (as I’m sure you will see in my upcoming posts).  Coming up with Plan B and Plan C, etc. is definitely going to be a must.

3.  Apparently, I think using parentheses throughout my writing is important.  If this is something that annoys you immensely (or maybe only slightly), I apologize.  It doesn’t seem like that’s going to change anytime soon… : )

Thanks for reading this far (or maybe just skipping down to the last para), and hopefully you’ll come back to check out what I’m up to!

And as a preview, I’ll soon be posting on the process I’ve gone through so far… Can you say RESEARCH?

: ) Brandi